
The Pick, Pack, and Ship feature allows greater flexibility to process and track the status of orders through the fulfillment and shipment processes. It gives your warehouse and shipping departments separate processes for each step to fulfil orders.
Warehouse employees pick the items needed to fulfil the order from inventory and then physically package them for shipping. Then, the shipping department marks orders shipped when the order is on the way to its destination
You can track orders through each step of the fulfillment process. Possible statuses for a fulfillment are:
- Picked– The items on the order have been picked from inventory and are waiting to be packed and shipped. This is a non-posting transaction.
- Packed– The items on the order have been packed and are waiting to be shipped. This is a non-posting transaction.
- Shipped– The items have been shipped out, and the order is completely fulfilled. This is a posting transaction.
To enable feature:
- Go to Setup -> Company -> Enable Features
- On the Transactionssubtab, check these boxes:
- Pick, Pack and Ship
- Advanced Shipping
- Click Save.


When the Pick, Pack, and Ship feature is activated, orders are fulfilled in three stages:
Fulfil Orders (Pick), Mark Orders Packed (Pack) and Mark Orders Shipped (Ship)
You can fulfil orders individually or in bulk

Cool Tips:
1) Unpicking Items Already Picked:
If you have picked items to fulfil an order, but then need to “unpick” or cancel the picking of the items, you must edit the item fulfillment record.
To edit an item fulfillment, go to Transactions -> Sales -> Fulfill Orders > List, click Edit next the record you want to edit, and then do one of the following:
- To unpick one or more items – but not all items – clear the Fulfill box next to each item, and then click Save to confirm the changes. The unpicked items are removed from the item fulfillment. You can continue to fulfill the other picked items.
- To unpick all items, select Delete from the Actions menu. The item fulfillment record is deleted from the system.
2) You can also enable a preference to send a confirmation email showing the total quantity shipped upon fulfillment of orders. For more information, please see my article on Order Confirmation email.
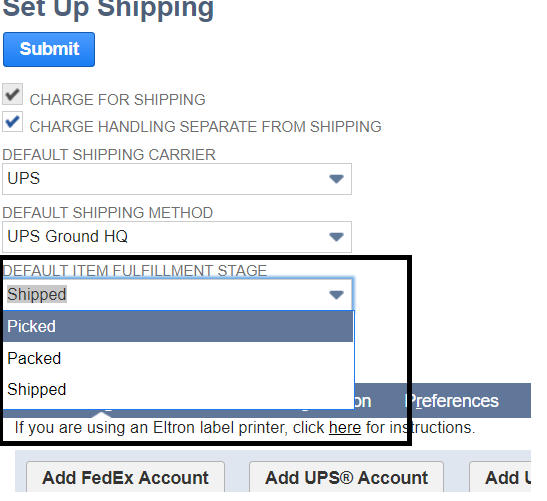
3) To set a default Item Fulfilment Stage:
- Go to Setup -> Accounting -> Shipping
- In the Default Item Fulfillment Integration Stagefield, select the Picked, Packed, or Shipped stage you want to use as the default fulfillment status in your sales order process. When you fulfil an order, this is the status of the sales order on the Item Fulfillment page. You can always select a different stage when fulfilling an order.
4) When you use the Pick, Pack and Ship feature, you can fulfil in one accounting period and ship in another. To fulfill across periods, you must enable the Update Transaction Date Upon Fulfillment Status Change preference. Preferences can be set at Setup (Administrator) -> Accounting -> Accounting Preferences -> Order Management subtab -> Update Transaction date upon fulfillment status change

After this preference is enabled, NetSuite can update the transaction date based on status changes. When you initially enter the fulfillment, the transaction date field is populated with the current date. Orders function depending on their status, as described below:
Picked
- If the Pick Date field is empty, it populates with the current date and the Transaction Date field is populated with the current date.
Packed
- If the Pick Date field is empty, it populates with the current date.
- If the Pack Date field is empty, it populates with the current date and the Transaction Date field is populated with the current date.
Shipped
- If the Pick Date field is empty, it populates with the current date.
- If the Pack Date field is empty, it populates with the current date.
- If the Ship Date field is empty, it populates with the current date and the Transaction Date field is populated with the current date.
- The Accounting Period field is required, and it is populated based on the Ship Date.
Note: You cannot edit, delete, or save a transaction with a Shipped status that is posting to a closed accounting period.
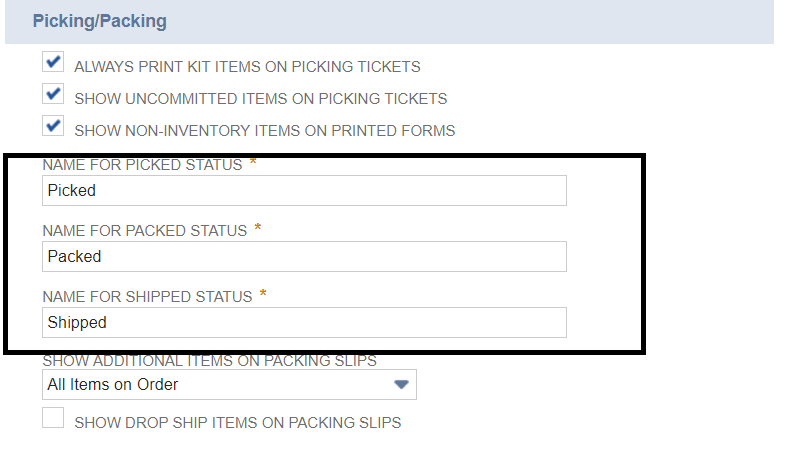
5) Relabel Picked, Packed and Shipped:
If your process uses a different title for Picked, Packed and Shipped, you can relabel the same as per your choice.
Preferences can be set at Setup (Administrator) -> Accounting -> Accounting Preferences -> Order Management subtab -> Picking/Packing
6) Allow Overage on Item Fulfilments:
Though not a recommended practice, if you have a scenario where in which you need to be able to enter a quantity larger than the quantity remaining for an item on a fulfillment, then you need to enable a specific setting.
Setup (Administrator) -> Accounting -> Accounting Preferences -> Order Management subtab -> Fulfillment-> Check Allow Overage on Item Fulfillments
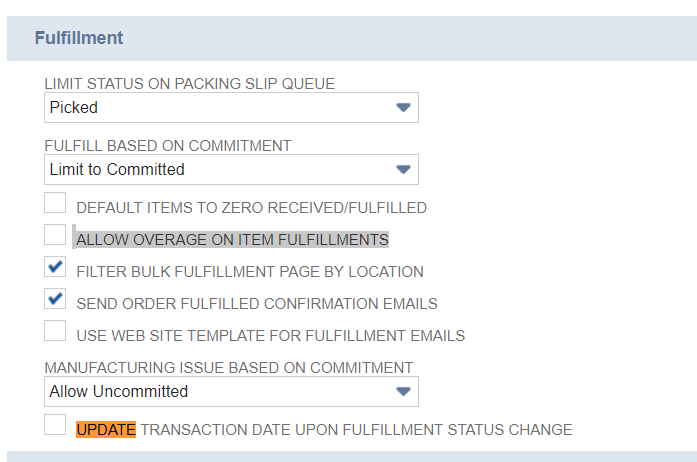
Clear this box to limit the quantity fulfilled to the quantity remaining on the fulfillment.
I hope these points help.
Leave a Reply