
How will NetSuite’s latest upgrade, 2018.1, affect you?
The 2018.1 enhancements and changes listed in this document are not available to customers until they are upgraded to NetSuite 2018.1
ACCOUNTING
Enhanced Setup of GL Audit Numbering Sequences
The GL Audit Numbering feature applies gapless numbering sequences to all GL posting transactions. Gapless GL audit numbering enables companies to meet international compliance requirements. The feature enables you to set up and run unique GL audit numbering sequences for of your GL posting transactions.
Prior to 2018.1, when you set up a numbering sequence, you defined each sequence as a line item on the GL Audit Numbering Setup page. You were limited in the definition of the sequence. In addition, if you deleted a line item, you lost the numbering history associated with the sequence run. Now, each numbering sequence is saved as a separate record and the history is maintained on the GL Audit Numbering Sequence page. The new GL Audit Numbering Sequence page provides an enhanced setup experience with additional options to define. In addition, you can copy a GL audit numbering sequence from one accounting period to the next. You can also inactivate a numbering sequence if it is no longer useful to your organization.
Now when you run a GL audit numbering sequence, you can view the details of an invalid run. And, if you have copied a sequence from one accounting period to the next, you can view the details associated with the next period. For more information on running a numbering sequence, see the help topic Running GL Audit Numbering Sequences.
GL Impact Locking
In some countries, the general ledger impact of a transaction must be locked to the general ledger. In these countries, an administrator can check the GL Impact Locking box on the Company Information page, or on the subsidiary record in NetSuite OneWorld.
When the GL Impact Locking box is checked, changes to GL numbered impacting transactions after running a GL audit numbering sequence automatically generates copy and reversal transactions. These transactions display on the GL Impact subtab on the original GL impacted transaction.
Enhanced Foreign Currency Variance Posting Rules
In 2017.1, NetSuite introduced the Foreign Currency Variance Mapping feature, which lets you create foreign currency variance posting rules to control the accounts to which foreign currency gains and losses post. In 2018.1, foreign currency variance posting rules are enhanced as follows:
■ More standard fields are available to create rule criteria. ■ Custom fields and custom segments are available as rule criteria. ■ The rule criteria fields are multi-select lists when appropriate for the field type. ■ You can now copy posting rules to create new rules with similar criteria. ■ You can now assign priority to rules to ensure that higher priority rules match first. ■ The Foreign Currency Variance Posting Rules page, where you create rules, has been redesigned for a better user experience.
Print Multiple Journal Entries Using Advanced PDF/HTML Templates
In 2017.2, if the Advanced PDF/HTML Templates feature was enabled, you could print a single journal entry of the following journal entry types:
■ Journal Entries (Book Generic and Book Specific) ■ Inter-company Journal Entries (Book Generic and Book Specific) ■ Advanced Inter-company Journal Entries (Book Generic and Book Specific)
In 2018.1, if you are logged in with the Administrator role, you can print multiple journal entries of all journal types from the Print Checks & Forms page at Transactions > Management > Print Checks and Forms. The Journals link provides access to the Print Journals page. You can filter the journal entries that appear on this page through customisation. You can also reprint journal entries that have already been printed.
Change in Logic for Determining Whether Foreign-Currency-Denominated Invoices Are Paid in Full
Previously, the logic to determine whether a foreign currency invoice was paid in full used the base currency translation of the invoice balance. As a result, rounding during currency conversion could cause an underpaid invoice to appear to be paid in full. For transactions created in 2018.1, the invoice balance in the foreign currency is considered when determining whether an invoice is paid in full. Thus, a foreign-currency-denominated invoice now remains open until the invoice balance equals zero in both the foreign currency and the base currency.
ADMINISTRATION
Changes to the Role Page
Fields that allow administrators to restrict roles (Web Services Only, Single Sign-on Only, Restrict this Role by IP Address, and Restrict this Role by Device ID) are grouped under the new Authentication section on the Role page. Two-factor Authentication Required and Duration of Trusted Device. Adding these fields to the Role page lets you configure a role as 2FA required without needing to navigate to the Two-factor Authentication Roles page.
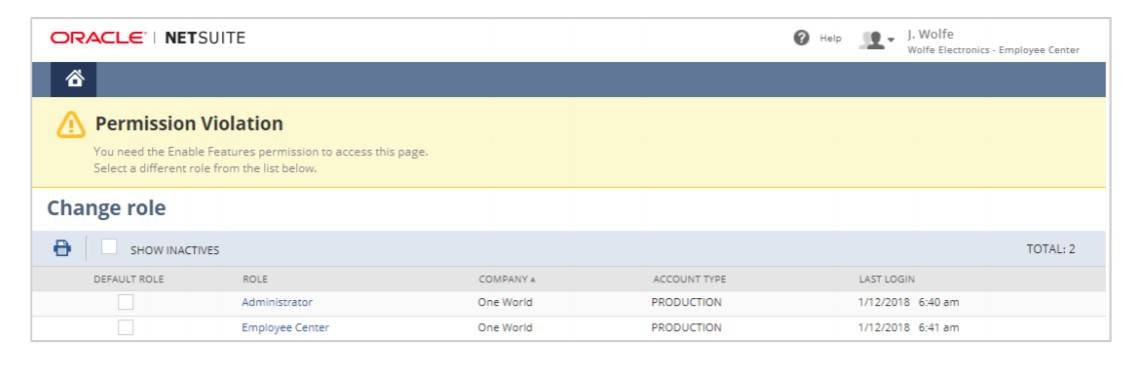
Help with Permission Violation Errors:
Change Role Option: Many NetSuite users have more than one role in NetSuite. For example, a user might have an Employee Centre role and other roles that they use to perform their tasks in NetSuite. Each role has different permissions for access to resources in NetSuite. Occasionally, users encounter a permission violation error. Permission violation errors can occur when a user is logged in, but in a role that does not have permission to access a specific resource. An example of this situation occurs when the user clicks a link in an email or selects a bookmark.
Help is now available to gracefully recover from these permission violation errors. If the current role does not have adequate permission, a list of the user’s roles is displayed below the error message. The user can switch to a role with the necessary permission. After switching to a role with the relevant permission, the user is redirected to the requested resource.
Employee Permission Updates
When an account is upgraded from 2017.2 to 2018.1:
■ The Employee Record permission is automatically added to standard and custom roles that have the Employee Navigation, Employee Search, or the Employees permission. ■ The Employee Navigation and Employee Search permissions are automatically removed. ■ The Employee Record permission explicitly controls the ability to search for employees and gives access to the navigation menus for employees, for example Lists > Employees. To maintain existing behaviour, do not remove this permission.
BANKING
Changes to Bank Statement Imports:
In NetSuite 2018.1, the following enhancements have been made to bank statement imports:
■ You can now import a bank or credit card statement file in CSV format with UTF-8 encoding. This CSV file must adhere to the provided CSV template and constraints. Download the CSV template from Transactions > Bank > Import Online Banking Data. ■ In the Account list on the Account Statement Reconciliation page, there are now visual indicators to show which accounts require reconciliation. The indicators only appear immediately after import.
Delete Reconciled Statements:
In NetSuite 2018.1, you can now delete reconciled statements. You may want to delete a reconciled statement and start over if you receive more transactions that you must include for a closed statement period. When you delete a statement, the transactions become unreconciled but remain matched. You also can no longer generate the associated reconciliation reports for the deleted statement. You can delete only the last statement. To delete the last reconciled statement, go to Transactions > Bank > Reconcile Account Statement > List and then click Delete.
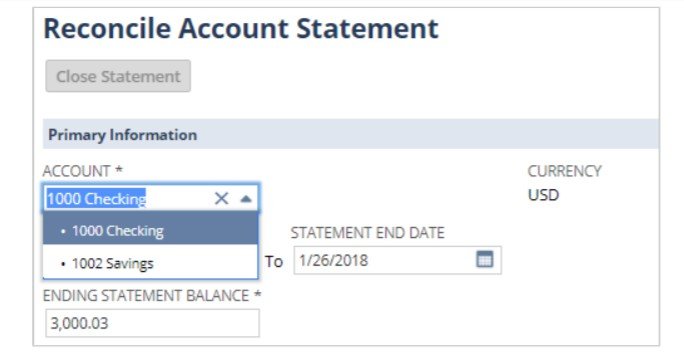
Change to Account Reconciliation Fields and Buttons:
In NetSuite 2018.1, the Statement End Date and Ending Statement Balance fields are now automatically populated with data from the imported statement, if available. The memos that appear in the GL Transactions list are the Memo field values from the Journal Entry or Check headers, not the transaction line-level memos. Go to Transactions > Bank > Reconcile Account Statement. For details, see the help topic Matching Transactions. Also, in the Reconciled Statements page, Make Changes is now Edit. You can also click Delete next to the last reconciled statement. To edit or delete a reconciled statement, go to Transactions > Bank > Reconcile Account Statement > List.
New Account Reconciliation Portlet:
In NetSuite 2018.1, an Account Reconciliation Summary portlet is now available on your dashboard. This portlet lists your bank and credit card accounts and displays key data for matching and reconciliation activities.
Improvements to Intelligent Transaction Matching:
New Transaction Types Available for Custom Rules:
When you specify rule conditions for custom matching rules, there are now more options available from the Transaction Types lists. For NetSuite general ledger transactions, the following transaction sub-types are now available for selection:
■ Credit Card Refunds ■ Credit Card Charges For the imported statement transactions, the following transaction types are now available for selection: ■ ACH ■ Deposits ■ Fees ■ Interest ■ Payments ■ Transfers
Inactivate Transaction Matching Rules:
In NetSuite 2018.1, instead of deleting transaction matching rules, you can temporarily make them inactive. You may want to inactivate certain default rules because you cannot delete default rules.
NetSuite stops running inactivated rules for subsequent imports, but the rule stays in the list on the page. To inactivate a rule, go to Transactions > Bank > Reconciliation Matching Rules. Under the new Active column, you can clear or check the box in the row for a rule.
Automatic Correction to Matches when Transactions are Deleted:
Previously, when a transaction was deleted you had to find and undo any transaction matches manually. NetSuite now reverts the match and removes the cleared status if you delete an unreconciled transaction or void a general ledger transaction.
Include Accounts for Custom Transaction Matching Rules:
For NetSuite 2018.1, you can now specify the accounts on which a custom rule should run. NetSuite only runs the custom rule against transactions from the selected accounts. Previously, custom rules ran on all accounts. Any custom rules from 2017.2 automatically include all accounts, although you can see only those accounts for which you have permissions. To choose the accounts a custom rule runs for, go to Transactions > Bank > Reconciliation Matching Rules, and click New Rule. In the Custom Matching Rule window, the Accounts sub-tab is open by default. To switch from a list of all accounts to only the currently included accounts, click Show Included Only. To filter the list of accounts further, select a type from the Account Type list, or use the search field.
The list displays only the accounts your role has access to. Your user role must also have the Accounts permission with an access level of View.
CUSTOMER RELATIONSHIP MANAGEMENT
Customer Record Shared with Multiple Subsidiaries:
If you use NetSuite OneWorld, prior to 2018.1 you could assign a customer record to a single subsidiary. The Multi-Subsidiary Customer feature permits you to share a customer or sub-customer record with multiple subsidiaries. Then you can select any of those subsidiaries on core transactions created for that customer. The primary subsidiary assigned to a customer is selected by default on any transactions involving that customer. You can also associate transactions with any secondary subsidiary assigned to the customer. The subsidiary you select on transactions is maintained throughout the transaction workflow. For example, when you select a subsidiary on a sales order, that subsidiary appears on the subsequent invoice. The Multi-Subsidiary Customer feature enables you to save a multi-subsidiary customer as a multi-subsidiary vendor to create a single entity of multiple types. Single-entity records are useful when you want to have one entity represent both a customer and a vendor. The Multi-Subsidiary Customer feature also enables you to view a multi-subsidiary customer’s hierarchy (primary subsidiary, any assigned secondary subsidiary, and any sub-customer) at Lists > Relationships > Customers.
The Multi-Subsidiary Customer feature also enables you to view the following:
■ Customer balance information on the customer record ■ Secondary subsidiary information on core reports ■ Customer Statement by currency and by subsidiary
INVENTORY MANAGEMENT
Inventory Status:
The Inventory Status feature enables you to associate attributes to items for detailed tracking of inventory and to drive internal processes. By creating inventory status records, you can assign a status to quantities of an item and track that item’s available inventory by status. For example, you can create an Inspection status for items that are pending quality control inspection.
You can also control the sale of specific inventory by choosing whether to make inventory associated with each status available to be allocated to orders. For example, you can create a Damaged status to associate with items that should not be sold. Clear the Make Inventory Available box on the Damaged inventory status record to prevent items with that status from being sold.
Important: The Make Inventory Available setting does not apply to items on drop shipments and special order purchases. Items with an unavailable status can be allocated to sales orders marked as drop shipments or special orders. You can also receive unavailable items on the associated purchase order created from a drop shipment or special order sales order.
To enable the Inventory Status feature, go to Setup > Company > Enable Features and click the Items & Inventory tab. You must first enable the Advanced Bin/Numbered Inventory Management and MultiLocation Inventory features on the same page.
New Inventory Detail Searches:
The Inventory Status feature includes new associated Inventory Detail searches that add an Inventory Status column. When the Inventory Status feature is enabled, the current searches on the Inventory Detail sub-tab on item records are replaced with these new searches:
■ Inventory Number/Status On Hand ■ Inventory Detail On Hand ■ Bin/Status On Hand If you enable the Inventory Status feature, the searches on the Inventory Detail sub-tab on item records are updated as follows, depending on the item record type:
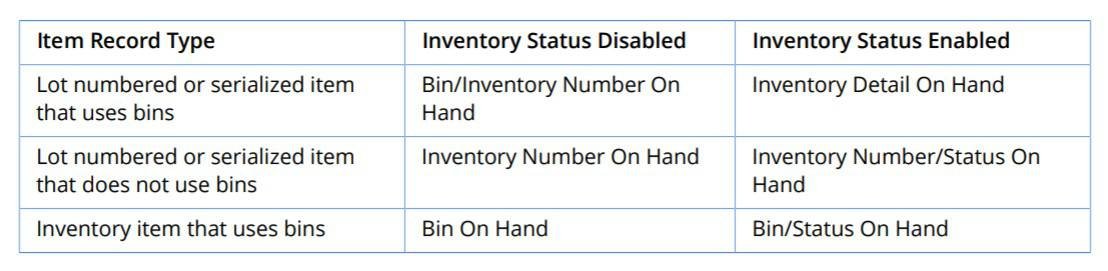
Existing searches are no longer used on the item record’s Inventory Detail sub-tab after the Inventory Status feature is enabled. Any customisation made to those searches do not appear there. For example, consider you have customised the Bin/Inventory Number On Hand search to add a custom column. After you enable the Inventory Status feature, that column does not appear on the Inventory Detail sub-tab on item records. If you enable the Inventory Status feature, you should customise the new searches to add columns you want to appear on the Inventory Detail sub-tab.
Updated Quantity Column and New Item Count Column:
Previously, the Quantity column on the Inventory Detail search results page showed positive or negative values. If the associated transaction added to your stocked inventory, the Quantity column showed positive values. If the associated transaction deducted from your stocked inventory, the Quantity column showed negative values. As of NetSuite 2018.1, the Quantity column shows absolute values, regardless of the positive or negative impact to your inventory. A new Item Count column appears in the Inventory Detail search results. This new column shows positive or negative values, depending on whether the associated transaction added to or deducted from your inventory. For example, a line item associated with an item receipt will appear as a positive value. A line item associated with an item fulfillment appears as a negative value. If you are using the values in the Quantity column, you may have to adjust your reporting to account for the new search result column values. If you want to report the absolute impact to your inventory, you can use the Quantity column values. If you want to report the positive or negative impact to your inventory, you can use the Item Count column values
Current Inventory Status Report Renamed to Current Inventory Snapshot Report:
To avoid confusion with the new Inventory Status feature and its purpose, the Current Inventory Status report has been renamed. The report otherwise remains unchanged and continues to show the same information as in previous releases. For more information on the report’s contents, see the help topic Current Inventory Snapshot Report. The report is available at Reports > Inventory/Items > Current Inventory Snapshot.
Supply Chain Control Tower The Supply Chain Control Tower feature enables you to analyse and simulate inventory supply and demand across your supply chain. This helps identify when supply is not in line with demand or planned levels. A thorough understanding of your inventory levels, supply, and demand helps you efficiently analyse and plan purchases and future inventory production. To enable the Supply Chain Control Tower feature, go to Setup > Company > Enable Features and click the Items & Inventory sub-tab. The Supply Chain Control Tower feature is available only when the Inventory feature and Multi-Location Inventory feature are enabled in NetSuite OneWorld. If item record and location restrictions apply to users in your account based on their assigned role, those restrictions will continue to apply when accessing inventory information using this feature.
When the Supply Chain Control Tower feature is enabled, snapshot forecasting simulations can be performed for Inventory items and Assembly/Bill of Materials items, including lot numbered and serial numbered items. When you view an item record, click the Supply Chain Snapshot button in the header to perform a simulation. On the Supply Chain Snapshot form, click Refresh to view the latest updates. When using the Supply Chain Control Tower feature, the accounting preference Create Work Order in Supply Planning can use any selection except Do Not Generate. Set inventory management preferences for the Supply Chain Past Order Horizon and Supply Chain Future Horizon to determine the time horizon range. On location records, check the Include in Control Tower box to allow the location to show in snapshots.
Cross-Subsidiary Fulfillment:
The new Intercompany Cross-Subsidiary Fulfilment feature in NetSuite OneWorld enables you to fulfil a single sales order from locations across multiple subsidiaries. Orders are no longer limited to being fulfilled from locations within the originating subsidiary.
For example, you might have a central order administration in your U.S. subsidiary that manages order placement and sales for the entire company and distribution centres in many subsidiaries. Orders placed in the purchasing subsidiary might best be fulfilled using inventory from locations in other subsidiaries to reduce shipping costs. When each sales order is entered, individual lines on the order can be assigned to a specified subsidiary for fulfilment. Then, each line item on the sale can be fulfilled and shipped from individual subsidiaries. Finally, an invoice for the order is generated from the originating central order administration to send to the customer.
Using the Inter-company Cross-Subsidiary Fulfilment feature can reduce your need to enter and process drop ship orders or inter-company transfer orders to get inventory where it needs to be. You can fulfil orders using inventory from multiple subsidiaries by creating Global Inventory Relationship records that define where to source inventory. You can also create a return material authorisation (RMA) associated with one subsidiary and receive the RMA line items in one or more locations in other subsidiaries. To enable the Inter-company Cross-Subsidiary Fulfilment feature, go to Setup > Company > Enable Features and click the Items & Inventory sub-tab. You must also enable the Advanced Shipping and Multi-Location Inventory features on the same page.
Order Fulfilment Changes Related to Cross-Subsidiary Fulfilment:
Enabling the Intercompany Cross-Subsidiary Fulfillment feature in NetSuite 2018.1 introduces the following order management changes:
■ With the Automatic Location Assignment feature enabled, you can assign fulfilment locations automatically from other subsidiaries. On the automatic location assignment rule record, check the Allow Locations From Other Subsidiaries box to assign locations from other subsidiaries. You can select individual locations from the subsidiaries as required. ■ When the Intercompany Cross-Subsidiary Fulfilment feature is enabled, the following order management features rely on the inventory location field instead of the location field. □ Store Pickup – Use the Inventory Location column to specify a store pickup location. ■ Fulfilment Request – The fulfilment request record uses the inventory location from the sales order as the fulfilment location.
Support for Duplicate Bin Names Across Locations:
NetSuite 2018.1 adds support for duplicate bin numbers across locations. Prior to this release, if you used the Multi-Location Inventory feature, you could not save a bin record if a bin with the same number existed at another location.
ORDER MANAGEMENT
SuitePromotions Automatically Add Free Gift:
If you use SuitePromotions, the Automatically Add Free Gift feature lets you create a promotion that offers an item for free. Furthermore, when the promotion is applied to an eligible transaction, the free gift is automatically added to the order. Previous to 2018.1 promotions that offered items for free were supported, however, those items had to be manually added to the order.
Automatically Add Free Gift ensures free gift promotions are conveniently included in any qualifying transaction. This saves the shopper and the merchant valuable time and improves the user experience. Parent-matrix items are currently not supported with the Automatically Add Free Gift feature and cannot be offered as the free gift.
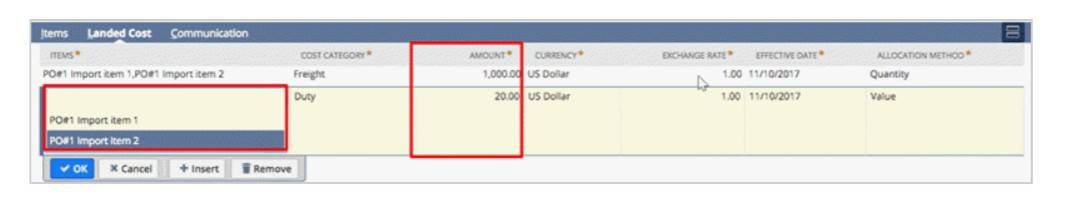
Landed Cost Added to Inbound Shipment:
Management Customers who use the inbound shipment management feature can now associate landed costs at the shipment level. Previously, to calculate shipment level landed costs you had to calculate these values outside of NetSuite and manually update individual item receipts. ISM landed costs completely automates this task. Key features:
■ Support for multiple-currency landed cost entries ■ Allocation of landed cost to a specific item or to all items on a shipment ■ Greater visibility of expected landed costs prior to receipt of goods ■ Supports Suitescript, allowing provision of custom calculations and rules To assign a landed cost to an item on an inbound shipment record, go to the new Landed Costs sub-tab.
Disabling the Pick, Pack, and Ship Feature:
As of NetSuite 2018.1, you cannot disable the Pick, Pack, and Ship feature when one or more item fulfilment records exist with a Picked or Packed status. To disable the feature, you must first move item fulfilment’s to the Shipped status or delete them.
Vendor Bill Cancellation Enhancements:
Using the Vendor Bills feature with 2018.1, a vendor bill can now be edited when it has a Cancelled status. Prior to 2018.1, a cancelled vendor bill could not be edited, copied, nor deleted. Now, when you try to cancel a vendor bill, a popup warning asks you to verify that you want to cancel the vendor bill. After you verify the cancellation, you can edit the vendor bill, but the Cancelled status cannot be changed.
Using Edit mode, new lines can be added or the bill can be deleted. Changes made are for reference only, such as adding a memo to indicate why the vendor bill was cancelled. A cancelled vendor bill can also be copied and the new copy will also have a Cancelled status. Because the new copy initially appears in Edit mode, the approval status can be changed to Pending Approval or Pending Receipt before you save it for the first time. The approval status is updated when you save the form.
Note that a cancelled vendor bill is not applied as being billed against the purchase order. For example, a purchase order is entered for 20 units. When 20 units are received, a vendor bill for 20 units is created, approved, and saved. Then, the purchase order status changes to fully billed. If that vendor bill is later cancelled, the purchase order status changes to the appropriate status as if the vendor bill was never entered. Depending on related transactions, the new status could revert to Pending Billing.
Note: Prior to Version 2018.1, when a vendor bill was cancelled, all quantities and amounts on the transaction form were cleared. Now, the quantities and amounts are no longer cleared. They are preserved to be referenced or copied.
FIXED ASSET MANAGEMENT:
Custom Segment Support for Fixed Assets Management:
Customers that use the Custom Segments feature will now be able to extend the functionality to their fixed assets. This feature will make your custom segments available in the following Fixed Assets Management records:
■ Asset Proposal Record ■ Asset Record ■ Acquisition Depreciation History Record ■ Depreciation History Record and associated journal entries ■ Transfer Depreciation History Record and associated journal entries ■ Revaluation History Record and associated journal entries ■ Disposal History Record and associated journal entries To take advantage of this feature, you must enable the Custom Segments feature (see the help topic Enabling the Custom Segments Feature). You must also apply the custom segment to the FAM record where you want it to appear
Change in Generating Depreciation Schedule Values:
In the previous version, if a change in the asset affects its depreciation values, the system will delete the existing depreciation schedule and create a new one. Starting with Fixed Assets Management version 18.1, changes to assets that affect its depreciation amount will no longer trigger an automatic reset of depreciation schedule values. Existing depreciation schedule values will still be deleted. New depreciation schedule values, however, will be generated every Sunday, 12 AM PST, or when the scheduled script is triggered manually
In FAM journals, the custom segment is shown on the main body or the line item, depending on how you mapped the fields. You can also choose to show the custom segments in fixed assets reports by customizing the XML report template.
Tax Methods in the Asset Revaluation Page
In Fixed Assets Management version 18.1, asset and tax records are now linked to an accounting book. For non multi-book accounts, all records will be tagged to the primary accounting book. With this change, the tax methods will now show in the Asset Revaluation page. Records are arranged by accounting book, GL posting tax methods, and then non GL posting tax methods.
Contact us for more information on these changes, or on NetSuite as a whole.